
[ad_1]
Taking good eclipse pictures is more durable than it seems to be. The final Nice American Eclipse, on Aug. 21, 2017, was photographed by lots of of hundreds of individuals — and lots of of them had been most likely dissatisfied of their outcomes. Overexposure, blurriness, and digicam malfunctions are all considerations in the event you aren’t ready. Listed below are some ideas you may comply with which may enable you to take higher photos of eclipses this month and past.
1. Choose Your Tools
Determine what optics you’ll be capturing by way of. It may very well be a digicam lens or the tube of a telescope. Additionally determine what you’ll be capturing with: a digital single-lens reflex digicam (DSLR) or mirrorless digicam, a point-and-shoot digicam, or your cellphone. Most significantly, you’ll want an accredited photo voltaic filter that goes over the entrance of your optics.
2. Apply As A lot As You Can
Don’t take your first photos of the Solar on eclipse day. Take some take a look at pictures first. To do this, go exterior on a sunny day, goal your filtered digicam on the Solar, and shoot. (NOTE: When not wanting by way of your filtered optics, put on photo voltaic glasses to guard your eyes as you look towards the Solar.) Set your lens to a hard and fast aperture — someplace between f/8 and f/16 — and take a variety of exposures. Look at the pictures and slender them all the way down to the very best two or three. That’s when to take a look at the EXIF information, the place all of the capturing particulars will probably be. Keep in mind, the Solar stays brilliant all through the eclipse, so that you received’t have to vary publicity occasions till the disk is a skinny crescent. At that time, add two extra publicity stops.
Getting ready a digicam for the Nov. 14, 2012, whole eclipse over Australia. Credit score: Alan Dyer
3. Determine What You Need To Shoot
There are a lot of methods to border a shot of the eclipse. Look by way of again problems with Astronomy or take a look at the Image of the Day photos on Astronomy.com for inspiration. You may mount your digicam on a tripod and take a single shot throughout totality. Or you could possibly take a sequence that reveals the development. To do that, goal your digicam on the Solar’s place at mideclipse and shoot about as soon as each 5 minutes. You’ll be able to later mix these pictures into one image utilizing varied software program. If you wish to take close-up pictures of the entire eclipse or beginning only a few minutes earlier than totality, one of the simplest ways is to connect your digicam to a motorized telescope mount.
Do that so your gear received’t shut down. And ensure all units are totally charged upfront. You’ll be able to by no means be too cautious.
5. Test Your Digital camera’s Reminiscence Card
Be certain the reminiscence card in your digicam has a minimum of twice the house you assume you’ll have to {photograph} the eclipse.
6. Arrive Effectively Earlier than The Occasion Begins
Don’t scramble to arrange minutes earlier than the eclipse. Beat the group by getting there early. You’ll be able to pick a major spot, arrange your gear, take a look at it, and cope with any issues with out stressing over time.
7. Use An Authorized Photo voltaic Filter
As ought to be clear from how typically it’s repeated, viewing and photographing the eclipse should solely be finished by way of an accredited photo voltaic filter. For photo voltaic glasses, search for the ISO 12312-2 score — the worldwide commonplace for direct photo voltaic viewing. In your eyes to be protected when viewing by way of a filtered digicam, stricter requirements apply. The filter — which fits on the entrance of your optics — should cut back the seen mild by an element of 128,000.
8. Safe Your Filter
Most photo voltaic filters made for telescopes match tightly on the entrance of the tube. Digital camera lenses, nevertheless, are available a greater variety of sizes. In case your filter is even barely unfastened, safe it with painter’s tape, which removes simply and won’t depart residue.
Don’t use eclipse glasses as a alternative for a photo voltaic filter when photographing totality. Credit score: Romeo Durscher/NASA Goddard/flickr
9. No Filter Throughout Totality
The Solar’s disk outshines the corona by one million occasions. That’s why we by no means see the corona besides throughout totality, when it’s the solely seen mild. To {photograph} this occasion, you’ll have to take away the filter out of your lens (or telescope) as soon as totality happens. Additionally, the corona is absolutely brilliant near the Solar’s edge however fainter removed from the Solar. Often, at a distance of about 1 photo voltaic diameter, your eyes received’t see the corona, however cameras will. So bracket your exposures throughout totality throughout a variety of shutter speeds to seize the complete dynamic vary of the scene.
10. Get A Digital camera-To-Scope Adapter
In the event you’re coupling your digicam’s physique to a telescope, you’ll want each a T-ring and a T-adapter. The T-adapter screws into the camera-specific T-ring. The adapter’s different aspect is a 1¼-inch-diameter tube that slides into your telescope’s focuser similar to an eyepiece, making your scope an enormous telephoto lens.
11. Use A Distant Shutter Launch
Why take the chance of presumably transferring your digicam and blurring your photograph simply by hitting the shutter? Gadgets that journey the shutter for you might be small, straightforward to make use of, wi-fi, and cheap.
12. Focus Is Important
Flip off your lens’ autofocus. That function doesn’t work nicely when aimed toward blue skies, nor in low-light circumstances. Additionally, most digicam lenses can now focus previous infinity, so you may’t simply flip the focuser all the way in which till it stops. Focus by aiming at a distant earthly object. Then don’t contact the main target ring once more — or safe it with painter’s tape, as talked about in No. 8.
13. Prep Throughout First Contact
The complete whole eclipse lasts 2 hours 19 minutes or extra within the U.S., however numerous that point is a sluggish build-up. Keep in mind, this occasion is all about totality. In the event you’re concentrating on capturing these three to 4 minutes, take the hour after first contact to do your remaining verify to see that every thing works. Then rehearse your plan a number of extra occasions.
14. Digital camera/Lens Area Of View
Many DSLRs exist at the moment, they usually all settle for a wide range of lenses. Plus, not all of them have the identical measurement sensors (chips). Right here is a simple means to determine a lens’ discipline of view (FOV) in your digicam: FOV = 2 * arctan (0.5 * s/f) * 57.3. On this equation, s stands for sensor dimension in millimeters and f is the focal size of the lens in millimeters. Word that this components is for only one dimension (width or top) of your chip. If you would like the FOV in each dimensions, do that calculation twice. (Discuss with “Selecting a digicam for eclipses,” within the December 2023 situation, for extra particulars.)
The illustration reveals an eclipse at totally different focal lengths on a full-frame and a crop-sensor DSLR. Credit score: Courtesy of Fred Espenak, www.MrEclipse.com
15. A Telescope’s Area Of View
However what in the event you’ll be attaching your digicam to a telescope? The calculation is similar. Use the components in No. 14, however insert your scope’s focal size for f. You’ll discover it on the tube, on the ring that secures the entrance optic, or in your instruction guide.
16. The Corona’s Dimension
In the event you’re photographing totality, the Solar’s disk is only the start. Between second and third contacts, it disappears. What will probably be seen is the corona, which stretches between 1 and 1.5 photo voltaic diameters from the Solar’s edge. A corona measuring 1 photo voltaic diameter can have a diameter of two.5°. A 1.5-solar-diameter corona will span 3.5°.
17. The Solar’s Dimension On Your Chip
After you determine the FOV of your digicam and lens mixture, it’s easy to calculate how a lot of your digicam’s sensor the Solar will cowl. Let’s say it has an FOV of 6° within the horizontal path. The Solar and Moon each have an angular diameter of 0.5°. So, the Solar’s width in your picture will probably be 0.5 divided by 6, or 8.3 p.c of the FOV.
18. Your Lens’ Focal Size
To seize the Solar throughout the partial phases, be sure to don’t choose a lens or telescope that restricts the view to lower than 0.5° within the vertical dimension. Enhance this to three° or perhaps a bit extra if you wish to {photograph} the corona.
19. Keep away from Small F-Ratios
In the event you’re utilizing a zoom lens or a teleconverter, the picture received’t be sharp in the event you shoot at f/1.4. As a substitute, choose an f-ratio from f/8 to f/11 to get higher photos.
20. Use A Tripod
The very best eclipse pictures is rarely handheld. Whereas picture stabilization sounds good, no photographer ought to belief it for capturing eclipses. You may have two decisions: Use a typical tripod or connect your digicam to a telescope mount (with or with out the scope) that sits on a tripod.
21. Digital camera Write Pace
How briskly you may take photos will depend on your camera-to-memory-card write pace. See how briskly your digicam will allow you to take photos by checking your SD card, which regularly has the write pace in megabytes per second (MB/s) listed on the entrance. The most recent cameras have write speeds at a minimal of 10 MB/s, whereas older DSLRs and point-and-shoot cameras are slower.
22. Take into account An Intervalometer
An intervalometer allows you to take time-lapse pictures. In the event you plan to seize close-up photos throughout the entire eclipse, this gadget will allow you to take exposures at any interval you select. Search on-line and also you’ll discover a wide range of intervalometers, additionally referred to as timer distant controls, for a lot of Canon and Nikon DSLRs. Newer cameras typically have built-in intervalometers — typically as a part of time-lapse features — or could also be managed remotely by way of a smartphone.
23. Totality Appears Transient
As newbie astronomer Norm Sperling wrote in an essay titled “Sperling’s Eight-Second Regulation” within the August 1980 situation of Astronomy, “Everybody who sees a complete photo voltaic eclipse remembers it endlessly … the curdling doom of the onrushing umbra, the otherworldly pink prominences, and the ethereal pearly corona. And extremely quickly, totality terminates. Then it hits you: ‘It was presupposed to final a couple of minutes — however that couldn’t have been true. It solely appeared to final eight seconds!’ ” I hope you get his level. In the event you encounter an issue that takes various seconds to repair, cease! Neglect about photographing the eclipse and as a substitute simply benefit from the view.
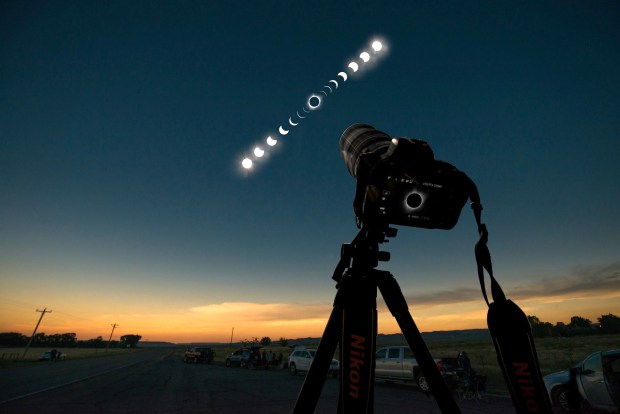
Credit score: Dmitrii Melnikov/Dreamstime.com
24. {Photograph} All the pieces
Carry a second digicam (or use the digicam in your cellphone) to be sure to can chronicle what’s taking place round you earlier than and after the eclipse. Doing so received’t break your expertise and can doc the actions of your loved ones, associates, or astronomy membership.
25. Be Euick About Processing Your Photographs
Processing your pictures shortly isn’t a lot recommendation for this eclipse however fairly recommendation for any photos, particularly ones you’ve gotten put a lot work into. Don’t let these photos simply sit in your laptop or reminiscence card and get forgotten about. Undergo every one as quickly as you may. And if you wish to, e mail your finest ones to readergallery@astronomy.com. Even in the event you aren’t all in favour of getting the pictures revealed, processing them shortly will even can help you share the thrill with the particular folks round you.
This text was initially revealed on Astronomy.com and up to date by Uncover Workers. Learn the unique right here.
[ad_2]
